PostgreSQL RelCache 和 SysCache 缓存

PostgreSQL 数据库大部分操作都依赖于系统表,因此为了加速访问,PostgreSQL 针对系统表提供了两种缓存:RelCache 和 SysCache。RelCache 和 SysCache 都是进程本地的,每个 backend 进程启动的时候都将创建自己的 RelCache 和 SysCache。本文将简要介绍一下这两类缓存。

  • RelCache 用于缓存表的 RelationData 结构(关系描述符 - reldesc),该结构由系统表中的元组构成。
  • SysCache 用于缓存系统表的元组信息。

RelCache 缓存

RelCache 缓存的相关实现在 src/backend/utils/cache/relcache.c 文件中,文件 src/include/utils/relcache.h 则包含了相关函数的声明。

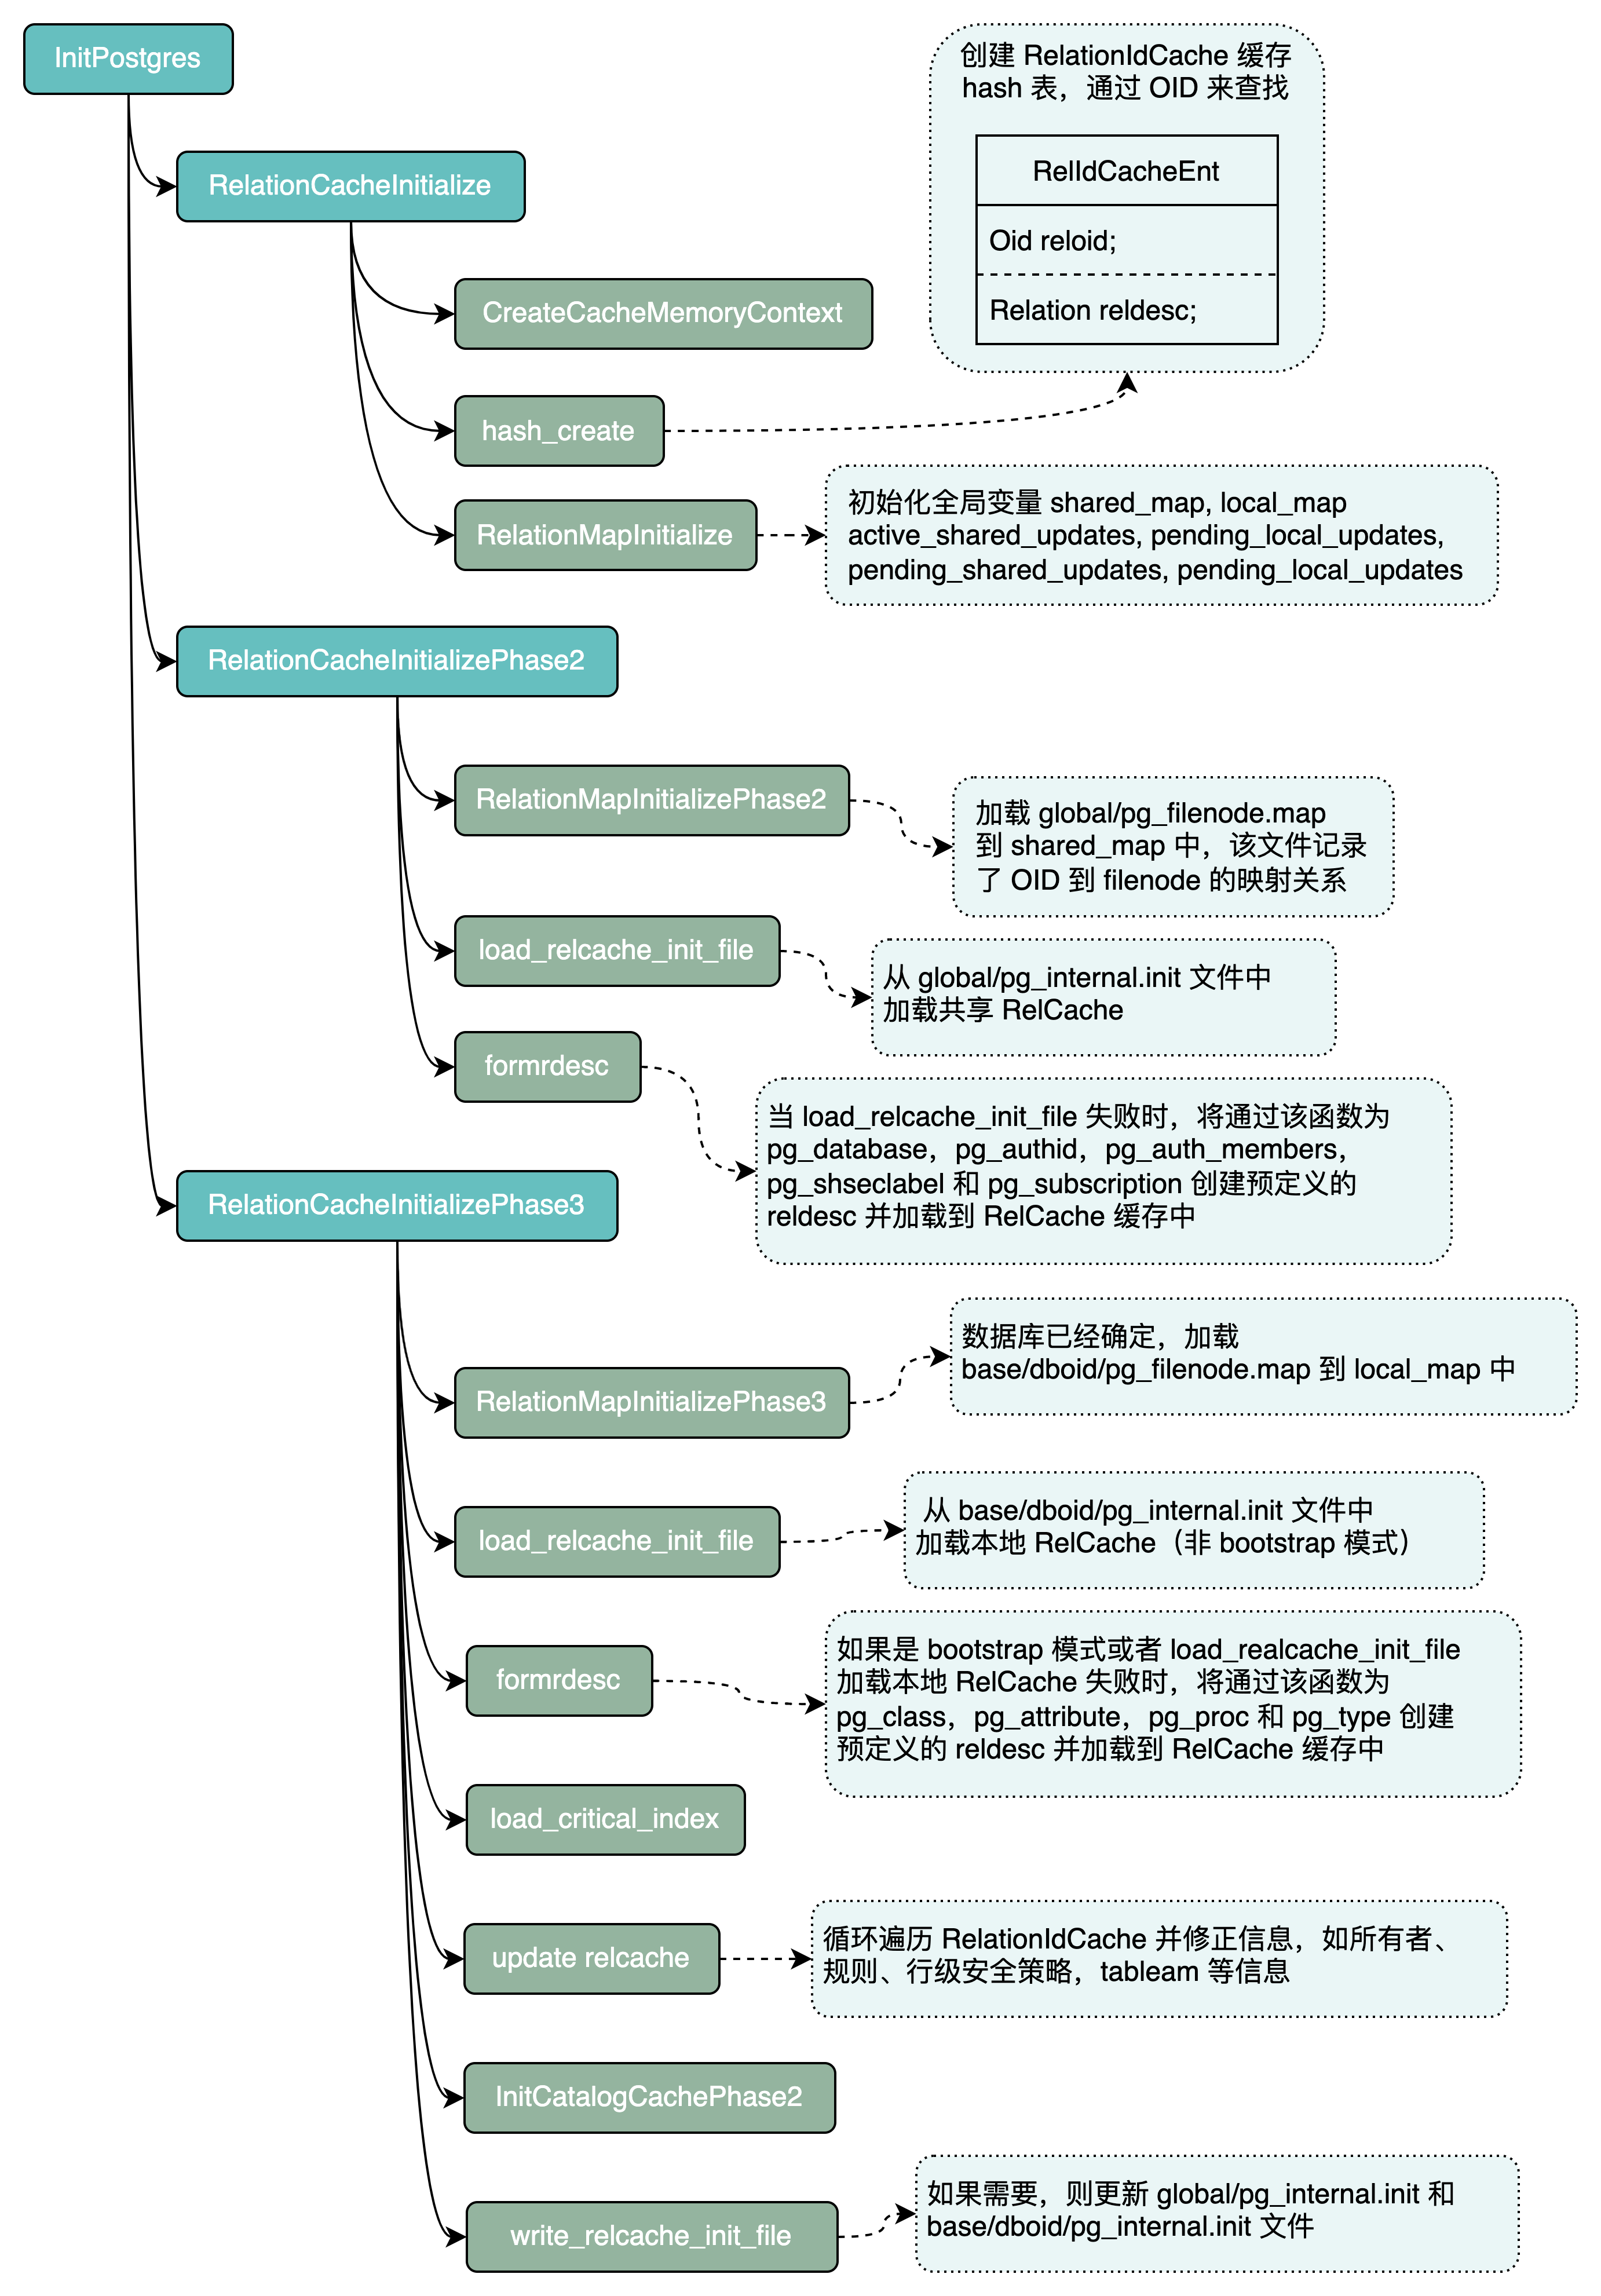
RelCache 的初始化可以分为三个阶段:

  1. RelationCacheInitialize - 初始化 reldesc 缓存(创建一个空的哈希表缓存),此阶段由于事务子系统还没有运行,因此不能访问数据库。
  2. RelationCacheInitializePhase2 - 该阶段主要是准备在启动时需要访问的共享系统表,此阶段至少需要加载 pg_databasepg_authidpg_auth_memberspg_shseclabel 系统表。理想情况下,我们也需要加载其相应的索引。该函数尝试从共享的 global/pg_internal.init 文件中加载 RelCache 内容,如果失败的话,那么将通过 formrdesc() 函数为其创建一个预定义的 reldesc
  3. RelationCacheInitializePhase3 - 当 CatCache 和事务系统正常运行,并且确定了数据库,则会调用该函数,在此之后,我们便可以从数据库的系统表中读取数据。

下图是整个 RelCache 初始化的流程。

RelCache 初始化完成之后,我们便可以通过 RelationIdGetRelation() 函数获取 reldesc,在使用完之后,调用 RelationClose() 函数进行清理。

RelationIdGetRelation() 通过 OID 查找 reldesc,如果缓存中不存在则通过 BuildRelationDesc() 函数创建一个并加入到缓存,同时增加其引用计数。如下是其具体的实现:

1
2
3
4
5
6
7
8
9
10
11
12
13
14
15
16
17
18
19
20
21
22
23
24
25
26
27
28
29
30
31
32
33
34
35
36
37
38
39
40
41
42
43
44
45
46
47
48
49
50
51
52
53
54
Relation
RelationIdGetRelation(Oid relationId)
{
Relation rd;

/* 确保处于有效的事务块中,即 TRANS_INPROGRESS */
Assert(IsTransactionState());

/*
* 从 RelationIdCache 缓存中查询,RelationIdCacheLookup() 是一个宏定义,
* 其本质是执行 hash_search() 进行查找,即
* hash_search(RelationIdCache, (void *) &relationId, HASH_FIND, NULL);
*/
RelationIdCacheLookup(relationId, rd);

if (RelationIsValid(rd))
{
/*
* 如果该 relation 已经被删除,则返回 NULL
*/
if (rd->rd_droppedSubid != InvalidSubTransactionId)
{
Assert(!rd->is_valid);
return NULL;
}

/* 增加引用计数 */
RelationIncrementReferenceCount(rd);

/* 是否需要重新验证有效性 */
if (!rd->rd_isvalid)
{
/*
* 索引只有有限的几种可能的模式变化,我们不想使用完整的过程,
* 因为这对重载本身所依赖的索引来说是一个令人头痛的问题。
*/
if (rd->rd_rel->relkind == RELKIND_INDEX ||
rd->rd_rel->relkind == RELKIND_PARTITIONED_INDEX)
RelationReloadIndexInfo(rd);
else
RelationClearRelation(rd, true);

Assert(rd->rd_isvalid ||
(rd->rd_isnailed && !criticalRelcachesBuilt));
}
return rd;
}

/* 缓存中不存在, 通过 RelationBuildDesc() 函数创建并加入到缓存 */
rd = RelationBuildDesc(relationId, true);
if (RelationIsValid(rd))
RelationIncrementReferenceCount(rd);
return rd;
}

关于 RelCache 缓存的梳理暂时收住,后续找时间在整理关于 RelCache 失效、同步等流程。

SysCache 缓存

SysCache 用于缓存系统表的元组信息,它的初始化相对简单,但是其使用要比 RelCache 稍微复杂一些,它们的源码主要集中在以下 4 个文件中:

  • src/backend/utils/cache/catcache.c
  • src/backend/utils/cache/syscache.c
  • src/include/utils/catcache.h
  • src/include/utils/syscache.h

当然,还是从初始化开始,InitCatalogCache() 时 SysCache 初始化的入口,其实现如下所示:

1
2
3
4
5
6
7
8
9
10
11
12
13
14
15
16
17
18
19
20
21
22
23
24
25
26
27
28
29
30
31
32
33
34
35
36
37
38
39
40
41
42
43
44
45
46
47
48
49
50
51
52
void
InitCatalogCache(void)
{
int cacheId;

/* 确保 SysCacheIdentifier 中的数量与 cacheinfo 中定义的数量相同 */
StaticAssertStmt(SysCacheSize == (int) lengthof(cacheinfo),
"SysCacheSize does not match syscache.c's array");

Assert(!CacheInitialized);

SysCacheRelationOidSize = SysCacheSupportingRelOidSize = 0;

for (cacheId = 0; cacheId < SysCacheSize; cacheId++)
{
SysCache[cacheId] = InitCatCache(cacheId,
cacheinfo[cacheId].reloid,
cacheinfo[cacheId].indoid,
cacheinfo[cacheId].nkeys,
cacheinfo[cacheId].key,
cacheinfo[cacheId].nbuckets);
if (!PointerIsValid(SysCache[cacheId]))
elog(ERROR, "could not initialize cache %u (%d)",
cacheinfo[cacheId].reloid, cacheId);
/* 记录 OID,之后可以通过二分查找加速查询 */
SysCacheRelationOid[SysCacheRelationOidSize++] =
cacheinfo[cacheId].reloid;
SysCacheSupportingRelOid[SysCacheSupportingRelOidSize++] =
cacheinfo[cacheId].reloid;
SysCacheSupportingRelOid[SysCacheSupportingRelOidSize++] =
cacheinfo[cacheId].indoid;
Assert(!RelationInvalidatesSnapshotsOnly(cacheinfo[cacheId].reloid));
}

Assert(SysCacheRelationOidSize <= lengthof(SysCacheRelationOid));
Assert(SysCacheSupportingRelOidSize <= lengthof(SysCacheSupportingRelOid));

/* 排序并去重,为二分查找做准备 */
pg_qsort(SysCacheRelationOid, SysCacheRelationOidSize,
sizeof(Oid), oid_compare);
SysCacheRelationOidSize =
qunique(SysCacheRelationOid, SysCacheRelationOidSize, sizeof(Oid),
oid_compare);

pg_qsort(SysCacheSupportingRelOid, SysCacheSupportingRelOidSize,
sizeof(Oid), oid_compare);
SysCacheSupportingRelOidSize =
qunique(SysCacheSupportingRelOid, SysCacheSupportingRelOidSize,
sizeof(Oid), oid_compare);

CacheInitialized = true;
}

其核心是 InitCatCache() 函数,该函数的主要任务就是分配内存,包括 CacheHdrCatCachebuckets 的内存。

1
2
3
4
5
6
7
8
9
10
11
12
13
14
15
16
17
18
19
20
21
22
23
24
25
26
27
28
29
30
31
32
33
34
35
36
37
38
39
40
41
42
43
44
45
46
47
48
49
50
51
52
53
54
55
56
57
58
59
60
61
62
63
64
65
66
67
68
69
70
71
72
73
74
75
76
77
78
79
CatCache *
InitCatCache(int id,
Oid reloid,
Oid indexoid,
int nkeys,
const int *key,
int nbuckets)
{
CatCache *cp;
MemoryContext oldcxt;
size_t sz;
int i;

/*
* nbuckets 是在这个 catcache 中使用的哈希桶的初始数量。
* 如果太满,稍后会扩大。
*
* nbuckets 必须是 2 的幂。我们通过 Assert 而不是完整的运行
* 时检查来检查这一点,因为这些值将来自常量表。
*/
Assert(nbuckets > 0 && (nbuckets & -nbuckets) == nbuckets);

/*
* 如果 CacheMemoryContext 还没有创建,则先创建该内存上下文。
* 我们需要先切换到缓存上下文,这样我们的分配就不会在事务结束时消失。
*/
if (!CacheMemoryContext)
CreateCacheMemoryContext();

oldcxt = MemoryContextSwitchTo(CacheMemoryContext);

/* 第一次运行,先初始化缓存组头 */
if (CacheHdr == NULL)
{
CacheHdr = (CatCacheHeader *) palloc(sizeof(CatCacheHeader));
slist_init(&CacheHdr->ch_caches);
CacheHdr->ch_ntup = 0;
#ifdef CATCACHE_STATS
/* 设置进程退出时转储统计信息的回调函数 */
on_proc_exit(CatCachePrintStats, 0);
#endif
}

/*
* 分配新的 CatCache 结构,并保持缓存对齐。
*
* 注意:我们将内存置为 0 来正确初始化 dlist 头。
*/
sz = sizeof(CatCache) + PG_CACHE_LINE_SIZE;
cp = (CatCache *) CACHELINEALIGN(palloc0(sz));
cp->cc_bucket = palloc0(nbuckets * sizeof(dlist_head));

/*
* 为这个缓存对应的关系初始化缓存的关系信息,并初始化一些新
* 缓存的其他内部字段。但暂时不要打开关系。
*/
cp->id = id;
cp->cc_relname = "(not known yet)";
cp->cc_reloid = reloid;
cp->cc_indexoid = indexoid;
cp->cc_relisshared = false; /* temporary */
cp->cc_tupdesc = (TupleDesc) NULL;
cp->cc_ntup = 0;
cp->cc_nbuckets = nbuckets;
cp->cc_nkeys = nkeys;
for (i = 0; i < nkeys; ++i)
cp->cc_keyno[i] = key[i];

/* 调试信息,暂时可以不予理会 */
InitCatCache_DEBUG2;

/* 头插法插入到缓存组头部 */
slist_push_head(&CacheHdr->ch_caches, &cp->cc_next);

/* 返回前切换内存上下文 */
MemoryContextSwitchTo(oldcxt);

return cp;
}

上述过程执行完成之后,其内存布局大致如下图所示:

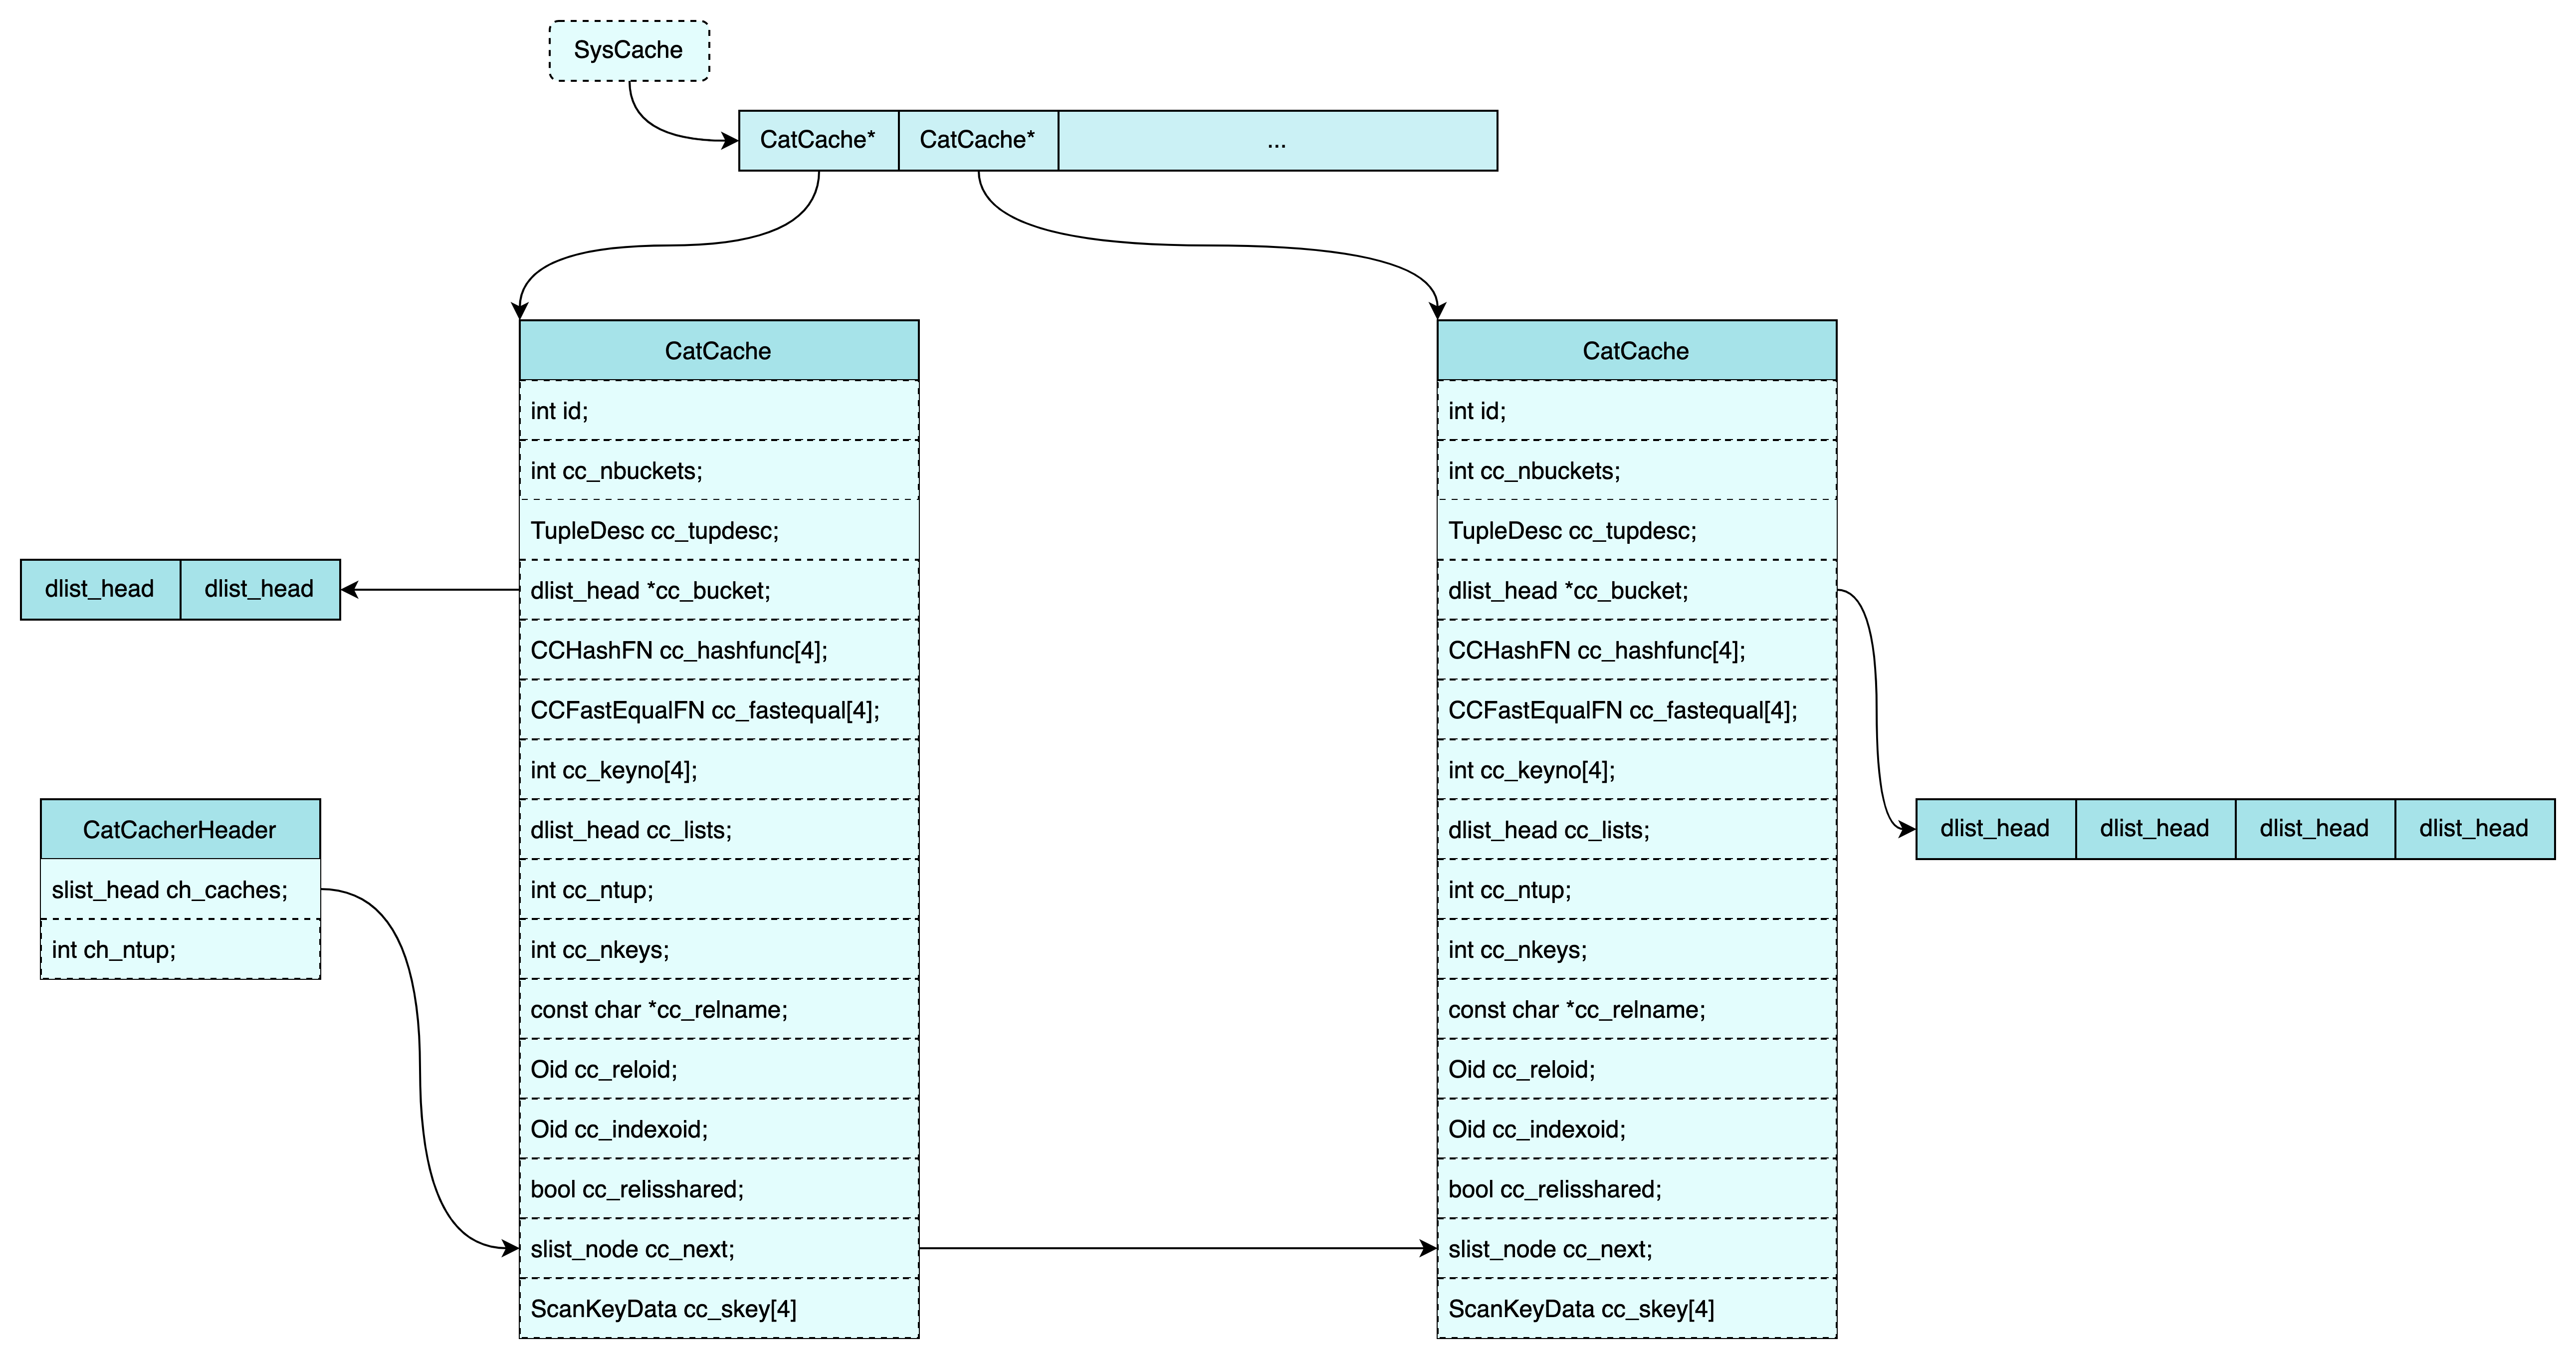
上面的过程仅仅是分配内存和初始化缓存结构,在第一次使用该缓存时才会查询数据库以完成缓存的初始化。

接下来我们看看如何使用该缓存。PostgreSQL 提供了 SearchSysCache() 来查询缓存,它是对 SearchCatCache() 的封装,如下所示:

1
2
3
4
5
6
7
8
9
10
11
12
HeapTuple
SearchSysCache(int cacheId
Datum key1,
Datum key2,
Datum key3,
Datum key4)
{
Assert(cacheId >= 0 && cacheId < SysCacheSize &&
PointerIsValid(SysCache[cacheId]));

return SearchCatCache(SysCache[cacheId], key1, key2, key3, key4);
}
1
2
3
4
5
6
7
8
9
HeapTuple
SearchCatCache(CatCache *cache,
Datum v1,
Datum v2,
Datum v3,
Datum v4)
{
return SearchCatCacheInternal(cache, cache->cc_nkeys, v1, v2, v3, v4);
}

类似的还有 SearchSysCache1()SearchSysCache2()SearchSysCache3()SearchSysCache4(),它们将检查键的数量是否与其相等。它们最终会调用 SearchCatCacheInternal()SearchCatCacheMiss() 函数,其调用关系如下图所示:

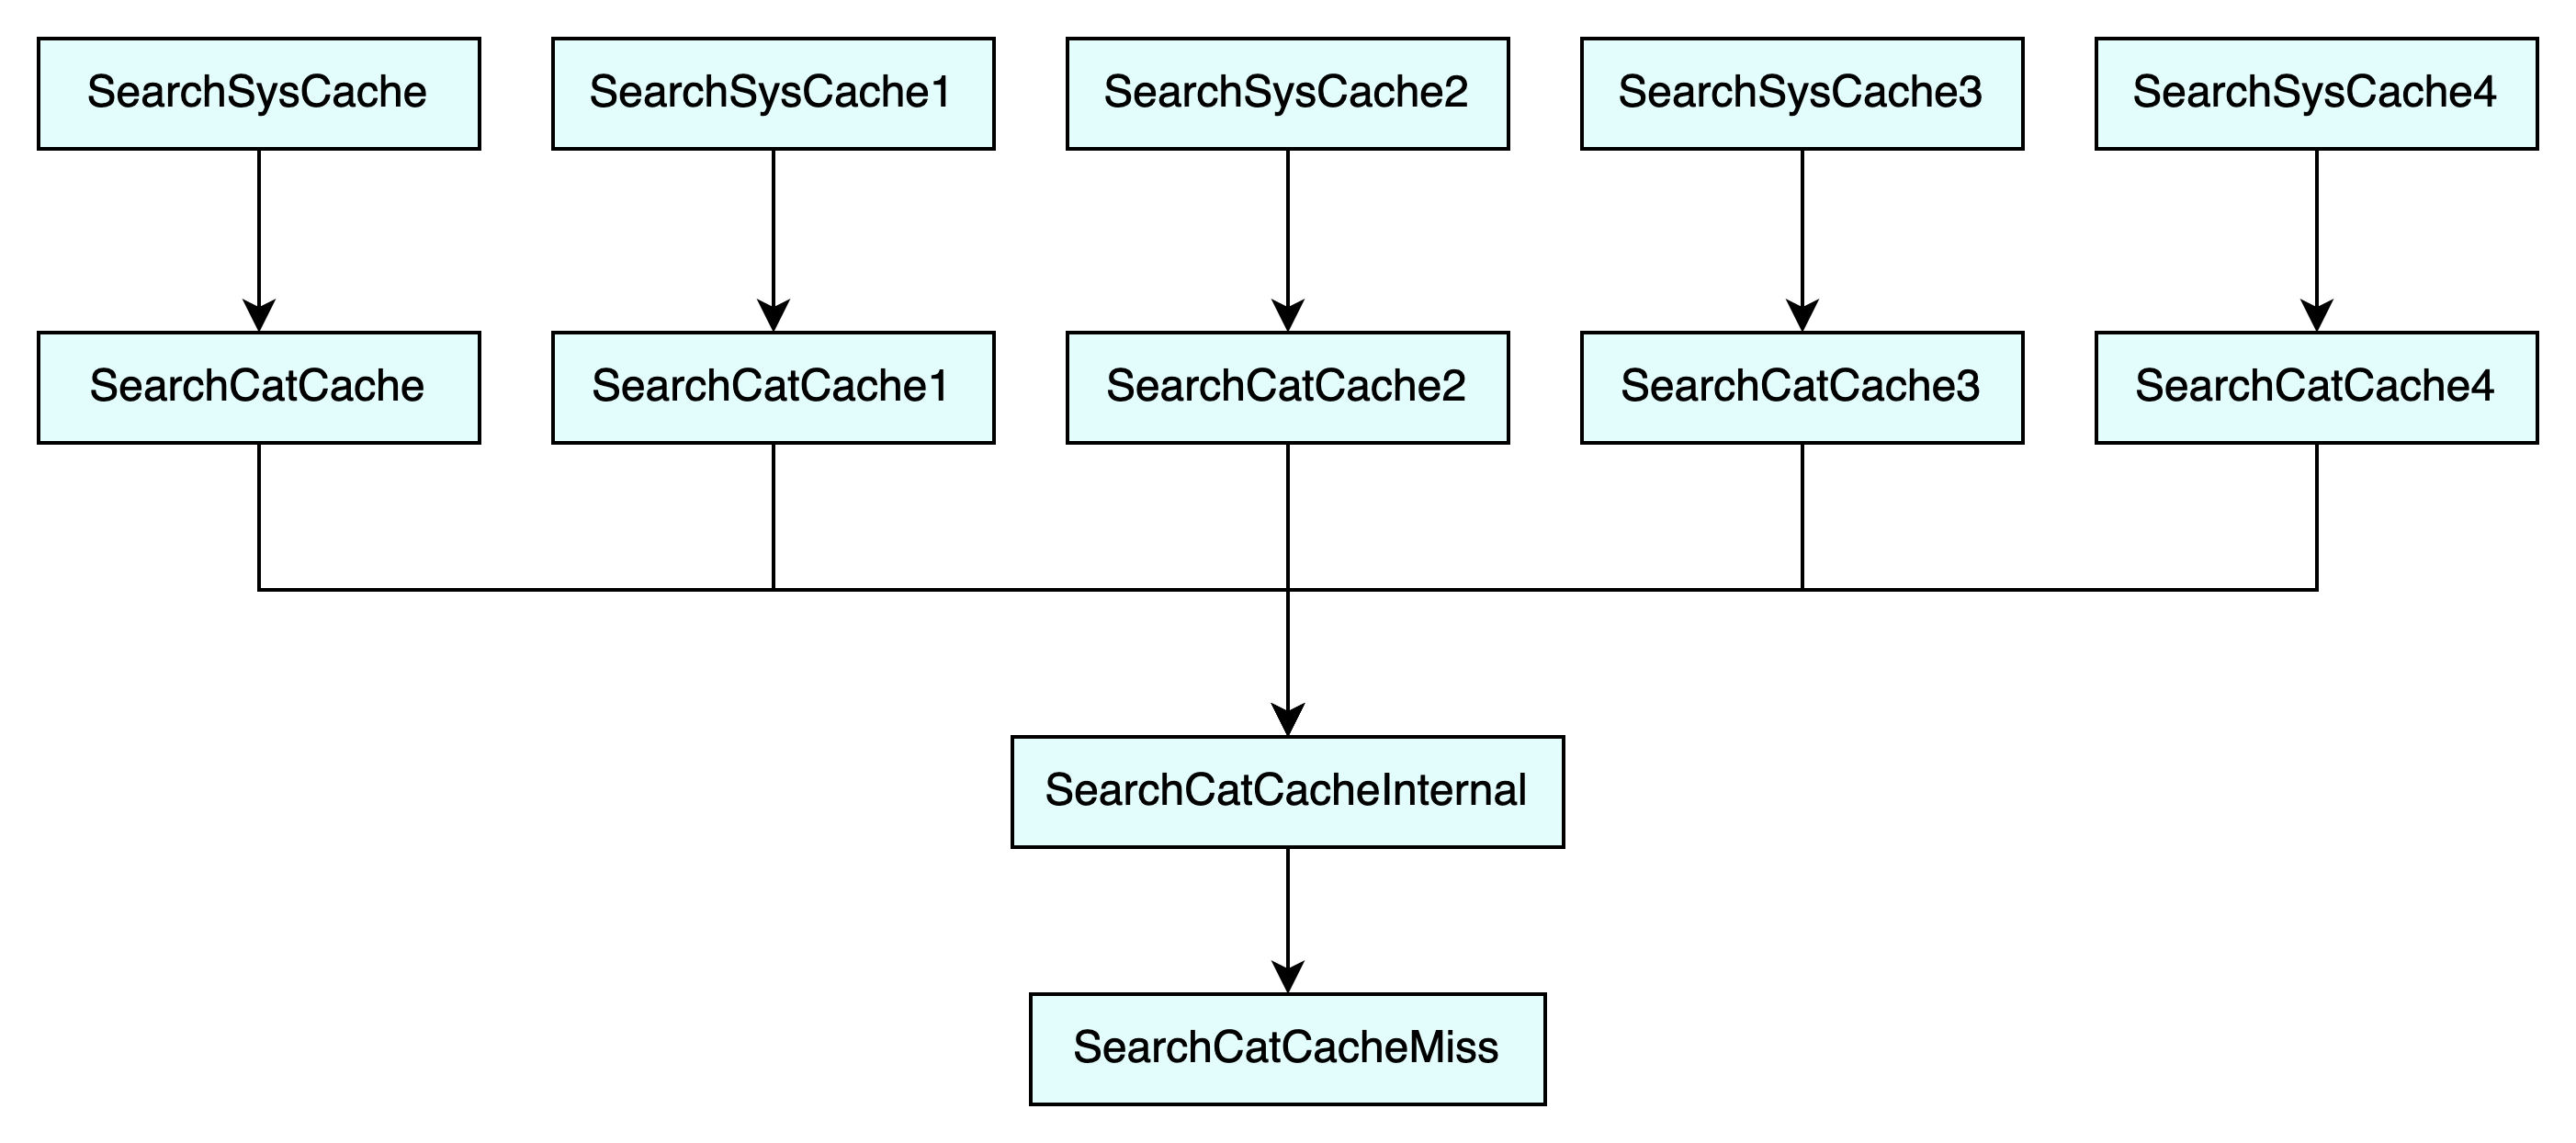
不难看出其核心就在 SearchCatCacheMiss() 函数中,当缓存未命中时,它将读取表元组信息并将其加入到缓存中。

1
2
3
4
5
6
7
8
9
10
11
12
13
14
15
16
17
18
19
20
21
22
23
24
25
26
27
28
29
30
31
32
33
34
35
36
37
38
39
40
41
42
43
44
45
46
47
48
49
50
51
52
53
54
55
56
57
58
59
60
61
62
63
64
65
66
67
68
69
70
71
72
73
74
75
76
77
78
79
80
81
82
83
84
85
86
87
88
89
90
91
92
93
94
95
96
97
98
99
100
static pg_noinline HeapTuple
SearchCatCacheMiss(CatCache *cache,
int nkeys,
uint32 hashValue,
Index hashIndex,
Datum v1,
Datum v2,
Datum v3,
Datum v4)
{
ScanKeyData cur_skey[CATCACHE_MAXKEYS];
Relation relation;
SysScanDesc scandesc;
HeapTuple ntp;
CatCTup *ct;
Datum arguments[CATCACHE_MAXKEYS];

/* 初始化局部参数数组 */
arguments[0] = v1;
arguments[1] = v2;
arguments[2] = v3;
arguments[3] = v4;

/* 需要在关系中进行查找,复制 scankey 并填充键值。*/
memcpy(cur_skey, cache->cc_skey, sizeof(ScanKeyData) * nkeys);
cur_skey[0].sk_argument = v1;
cur_skey[1].sk_argument = v2;
cur_skey[2].sk_argument = v3;
cur_skey[3].sk_argument = v4;

/*
* 缓存中没有查找到 Tuple, 因此,我们需要打开表直接获取,如果找到,我们
* 会将其添加到缓存中;如果没有找到,我们将添加一个负缓存条目。
*
* 负缓存条目是指 CatCTup 中没有关联的 tuple 的条目。
*/
relation = table_open(cache->cc_reloid, AccessShareLock);

scandesc = systable_beginscan(relation,
cache->cc_indexoid,
IndexScanOK(cache, cur_skey),
NULL,
nkeys,
cur_skey);

ct = NULL;

while (HeapTupleIsValid(ntp = systable_getnext(scandesc)))
{
ct = CatalogCacheCreateEntry(cache, ntp, arguments,
hashValue, hashIndex,
false);
/* 立即增加引用计数 refcount = 1 */
ResourceOwnerEnlargeCatCacheRefs(CurrentResourceOwner);
ct->refcount++;
ResourceOwnerRememberCatCacheRef(CurrentResourceOwner, &ct->tuple);
break; /* 假设仅有一条记录匹配 */
}

systable_endscan(scandesc);

table_close(relation, AccessShareLock);

/*
* 如果 tuple 没有找到,我们需要构建一个包含假元组的负缓存条目。
* 假元组具有正确的键列,但其他任何地方都为空。
*
* 在 bootstrap 模式下,我们不需要构建负缓存条目,因为缓存失效机制不存在,
* 并且如果稍后创建元组则无法清除它们。(引导程序不执行更新,因此它不需
* 要缓存无效。)
*/
if (ct == NULL)
{
if (IsBootstrapProcessingMode())
return NULL;

ct = CatalogCacheCreateEntry(cache, NULL, arguments,
hashValue, hashIndex,
true);

CACHE_elog(DEBUG2, "SearchCatCache(%s): Contains %d/%d tuples",
cache->cc_relname, cache->cc_ntup, CacheHdr->ch_ntup);
CACHE_elog(DEBUG2, "SearchCatCache(%s): put neg entry in bucket %d",
cache->cc_relname, hashIndex);

/* 我们不返回负缓存条目给调用者,因此保持引用计数为 0。 */
return NULL;
}

CACHE_elog(DEBUG2, "SearchCatCache(%s): Contains %d/%d tuples",
cache->cc_relname, cache->cc_ntup, CacheHdr->ch_ntup);
CACHE_elog(DEBUG2, "SearchCatCache(%s): put in bucket %d",
cache->cc_relname, hashIndex);

#ifdef CATCACHE_STATS
cache->cc_newloads++;
#endif

return &ct->tuple;
}

CatalogCacheCreateEntry() 负责创建一个 CatCTup 结构并将其加入到 cache->cc_bucket,其中 hashIndex 用于索引 cache->cc_bucket,下面是该函数主要流程。

1
2
3
4
5
6
7
8
9
10
11
12
13
14
15
16
17
18
19
20
21
22
23
24
25
26
27
28
29
30
31
32
33
34
35
36
37
38
39
40
41
static CatCTup *
CatalogCacheCreateEntry(CatCache *cache, HeapTuple ntp, Datum *arguments,
uint32 hashValue, Index hashIndex,
bool negative)
{
[...]

if (ntp)
{
[...]

/* 创建一个正常的缓存条目 */
ct = (CatCTup *) palloc(sizeof(CatCTup) +
MAXIMUM_ALIGNOF + dtp->t_len);

[...]
}
else
{
Assert(negative);

/* 创建一个负缓存条目 */
ct = (CatCTup *) palloc(sizeof(CatCTup));

[...]
}

[...]

/* 加入到缓存中 */
dlist_push_head(&cache->cc_bucket[hashIndex], &ct->cache_elem);

cache->cc_ntup++;
CacheHdr->ch_ntup++;

/* 当 hash 表的填充因子大于 2 时,我们需要增大桶数量。 */
if (cache->cc_ntup > cache->cc_nbuckets * 2)
RehashCatCache(cache);

return ct;
}

当我们通过 SearchSysCache() 函数获取信息时,元组信息就会以 CatCTup 的形式缓存起来,其内存布局如下所示:

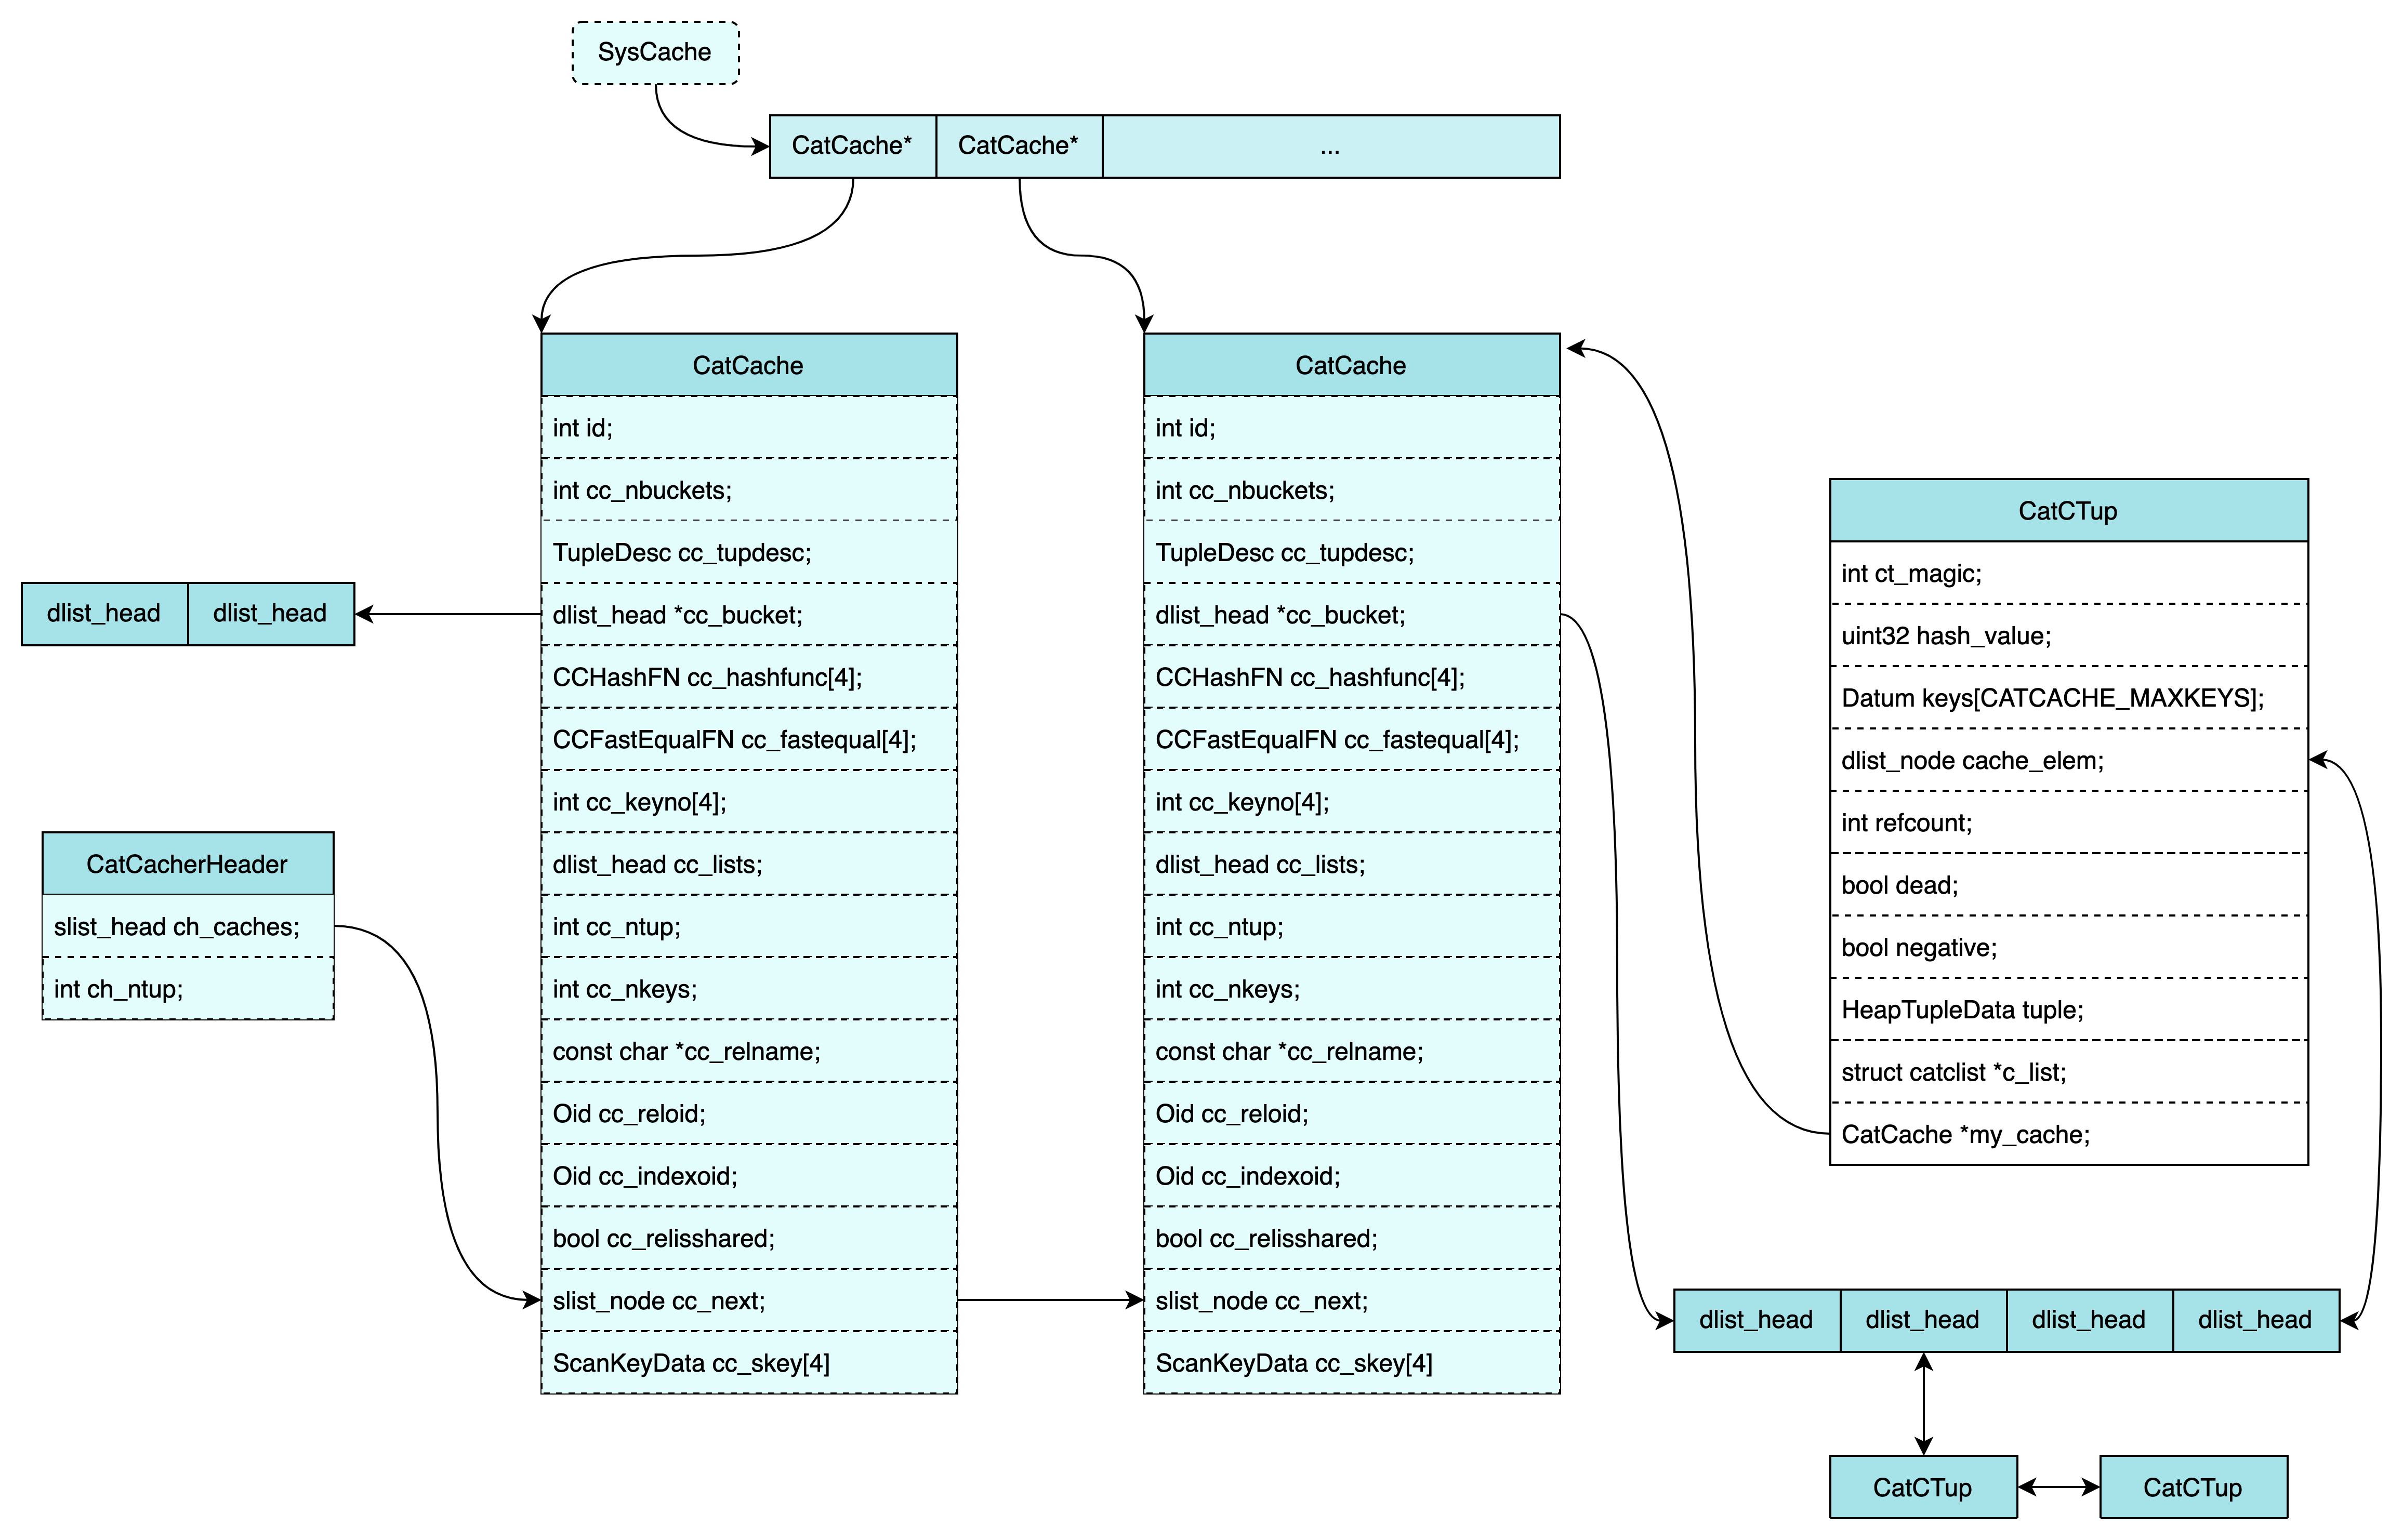
关于 SysCache 的分析暂时就到这里,这里面还有很多内容,如部分搜索(CatCTupstruct catclist *c_list 的处理,即 N 个键中前 K 个键的缓存处理)、缓存同步、失效等。

笑林广记 - 哭麟

孔子见死麟,哭之不置。
弟子谋所以慰之者,乃编钱挂牛体,告曰:“麟已活矣。”孔子观之曰:“这明明是一只村牛,不过多得几个钱耳。”